This post comes to you from the brilliant mind of Mr. Johnny Chung Lee, creator of the $14 "Poor Man's Steadycam".
Anywhoo, what we're trying to do here is mimic a $1000+ SMARTboard, cheesy music and all.
Take the jump for a video sample of the "real" SMARTboard and slightly more complete instructions.
Unfortunately, unless you already own a wii [or at least just a wii-mote] this project will cost you a little more than it did me.
The magic behind this project is that the wii-mote "sensor" is actually an infrared camera capable of tracking up to four IR dots. Therefore, by setting your wiimote on a stand, it can be used to track, say, what you're pointing to on a screen, and relay that back to a computer connected through bluetooth.
Now for the DIY part:
Since Johnny's been so kind as to provide the software for us, all we need on our end is:
- 1 Wii-mote
- 1 Computer, Bluetooth enabled of course
- 1 Something to stand your Wii-mote on [mic stand?]
- 1 IR "light pen"
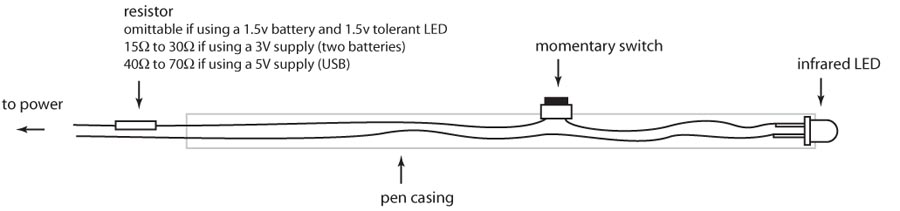
To build your own light pen, you'll need:
- 1 IR LED [anything from the Vishay TSAL6400s that Johnny recommends, to my cheap-ass LED ripped outta an old remote control.]
- A source of power [battery OR USB!]
- Resistor [may be optional, depending on your incoming voltage. See schematic below.]
- Some wire [once again, in an effort to be a complete Jew, I used come crappy copper wire that i found lying around my room.]
- A momentary [SPST] push switch [I'm too embarrassed to even explain how I pulled this one off with household items. Suffice to say it was... unorthodox. and should NOT be replicated.]
- Pen casing [AKA old gutted EXPO marker.]
Following this simplified schematic,
go ahead and build your own ghetto pen and see if you can make it work. Bask in the warm fuzziness of success when you do get it, then leave this pen on your desk untouched until the messheap claims it and you lose it forever. At least you'll have done it.
Stolen from johnnylee.net
head there for more useful tips.
how well does this work? i'm thinking about doing it myself, seems like a fun project.
ReplyDeleteWell, like i said. i used cheapo parts; and i mean REALLY cheapo. i soldered no joints, bought no materials, just grabbed a spring from somewhere to pop my AAA up and make the connection, and connected/held it all in place with yellow electrical tape. I'd show it to you next time we're all back in LA, but its almost too embarrassingly ghetto. [`fact, i think i already showed it to you last time you were over.. *wince*] however, considering how much i skimped on materials, i actually still got it to work pretty darn well using my 61incher as a board.
ReplyDeleteThere are really just two things that make || break how well your whiteboard works:
-the stability of your wiimote, and-
-wiimote placement.
I would say the best bet is to use a mic stand with one of those flex-"one size fits all"-heads, and placed up high and off to the side. this is cause when your body gets in front of the wiimote, /*obviously*/ it will stop working. what you need to do is put it off to the side of the hand that you DONT write with [so that your LED is actually in view of the camera], and at probably eye level or a little higher. The IR camera on the wiimote has a viewing angle of about 45o, so you'll have to place it carefully and make sure it stays still, otherwise you'll spend more time recalibrating than actually drawing.
I'm sure you can get it working quite nicely if you take the time and spend a little money on some higher-quality parts. specially the SPST switch and maybe splicing in a USB cable to draw power.
I would love if someone tried this with a projector, specially a rear-projection and reported back.